1.服务雪崩
1.1、引出服务雪崩
分布式场景下:
在高并发场景下:由于服务之间会进行调用,一旦某个服务不可用,那么就会出现服务雪崩
==一旦服务链路中出现了某个服务不可用,那么就会影响整个链路,从而出现不可预计的问题!==
服务雪崩的本质:由于调用的服务方不可用,就会导致对应的线程没有及时回收。
解决关键:不管是调用成功还是失败,只要线程可以及时回收,就可以解决服务雪崩。
1.2、雪崩三阶段
1、服务不可用:硬件故障/程序 Bug/缓存击穿/用户大量请求。
2、调用端重试加大流量:用户重试/代码逻辑重试。
3、服务调用者不可用:同步等待造成的资源耗尽。
1.3、如何解决服务雪崩
方案描述:
1、应用扩容:加机器或升级硬件。
2、流控:限流/关闭重试。
3、缓存预加载。
4、服务降级:服务接口拒绝服务/页面拒绝服务/延迟持久化/随机拒绝服务。
5、服务熔断。
方案一:修改调用的超时时长(不推荐)
思路:将服务间的调用超时时长改小,这样就可以让线程及时回收,保证服务可用
优点:非常简单,也可以有效的解决服务雪崩
缺点:不够灵活,有的服务需要更长的时间去处理(写库,整理数据)
方案二:设置拦截器(设置断路器)
思路:在调用远程服务前来设置一个拦截器来进行服务状态判断。
2.认识 Hystrix
2.1、服务熔断概念及断路器
问题描述:当下游服务因某种原因突然变得不可用或响应过慢,上游服务为保证自己整体服务的可用性,不再继续调用目标服务,直接返回,快速释放资源,如果目标服务情况好转则恢复调用。
解决方案:断路器模式。
断路器原理:当远程服务被调用时,断路器将监视这个调用,如调用时间太长,断路器将会介入并中断调用。 断路器将监视所有远程资源的调用,如对某个远程资源的调用失败次数足够多,那么断路器会出现并采取快速失败,阻止将来调用失败的远程资源。
状态图:
解析:
断路器最开始处于closed状态,一旦检测到的错误到达一定数量,断路器便转为open状态(断路器打开);
此时到达reset timeout时间会转移到half open状态;
尝试放行一部分请求到后端,一旦检测成功便回归到closed状态,即恢复服务断路器实现方案:阿里的 Sentinel、netflix 的 Hystric。
2.2、Spring Cloud Hystrix 介绍
熔断器,也叫断路器!(正常情况下 断路器是关的 只有出了问题才打开)用来保护微服务不雪崩的方法。
思想和我们上面画的拦截器一样。
Hystrix 是 Netflix 公司开源的一个项目,它提供了熔断器功能,能够阻止分布式系统中出现联动故障。
Hystrix 是通过隔离服务的访问点阻止联动故障的,并提供了故障的解决方案,从而提高了整个分布式系统的弹性。
==Hystrix 本质是代理 feign 的请求,从而完成熔断的效果!并且是在当前远程调用发起前对其进行代理!==
例如:微博 弹性云扩容 Docker K8s。
3.快速入门 Hystrix
3.1、搭建基础服务(服务提供方以及消费方)
项目版本:SpringBoot:2.3.12.RELEASE、SpringCloud:Hoxton.SR12
<parent>
    <groupId>org.springframework.boot</groupId>
    <artifactId>spring-boot-starter-parent</artifactId>
    <version>2.3.12.RELEASE</version>
    <relativePath/> <!-- lookup parent from repository -->
</parent>
<properties>
    <java.version>1.8</java.version>
    <spring-cloud.version>Hoxton.SR12</spring-cloud.version>
</properties>
注册中心使用之前案例中的 Eureka,然后在 04-hystrix 中创建两个服务来进行 demo 展示。
1、创建借车服务:01-rent-car-service
<dependency>
    <groupId>org.springframework.boot</groupId>
    <artifactId>spring-boot-starter-web</artifactId>
</dependency>
<dependency>
    <groupId>org.springframework.cloud</groupId>
    <artifactId>spring-cloud-starter-netflix-eureka-client</artifactId>
</dependency>

<dependency>
    <groupId>org.projectlombok</groupId>
    <artifactId>lombok</artifactId>
    <optional>true</optional>
</dependency>
① 配置文件 application.yml
server:
  port: 8081
spring:
  application:
    name: rent-car-service
eureka:
  client:
    service-url:
      defaultZone: localhost:8761/eureka
  instance:
    hostname: localhost
    instance-id: ${
   eureka.instance.hostname}:${
   spring.application.name}:${
   server.port}
② 在启动器中添加开启 EurekaClient:
@EnableEurekaClient③ 添加控制器:controller/RentController.java
package com.changlu.rentcarservice.controller;

import org.springframework.web.bind.annotation.GetMapping;
import org.springframework.web.bind.annotation.RestController;

/**
 * @Description:
 * @Author: changlu
 * @Date: 9:18 PM
 */
@RestController
public class RentCarController {


    @GetMapping("/rent")
    public String rent() {

        return "租车成功!";
    }

}2、创建消费者服务:02-customer-service
① 配置文件:application.yml:
server:
  port: 8082
spring:
  application:
    name: customer-service
eureka:
  client:
    service-url:
      defaultZone: localhost:8761/eureka
  instance:
    hostname: localhost
    instance-id: ${
   eureka.instance.hostname}:${
   spring.application.name}:${
   server.port}
② 在启动器中添加服务发现注解以及扫描 feign 包注解
@EnableEurekaClient
@EnableFeignClients(basePackages = "com.changlu.customerservice.feign") //开启feign包扫描
③ 创建 feign 包,添加租车服务的接口方法
package com.changlu.customerservice.feign;

import org.springframework.cloud.openfeign.FeignClient;
import org.springframework.web.bind.annotation.GetMapping;

/**
 * @Description:
 * @Author: changlu
 * @Date: 9:30 PM
 */
@FeignClient("rent-car-service")  //对应服务名
public interface CustomerRentFeign {


    @GetMapping("/rent")
    public String rent();

}
④ 创建控制器:controller/CustomerController.java
package com.changlu.customerservice.controller;

import com.changlu.customerservice.feign.CustomerRentFeign;
import org.springframework.beans.factory.annotation.Autowired;
import org.springframework.web.bind.annotation.GetMapping;
import org.springframework.web.bind.annotation.RestController;

/**
 * @Description:
 * @Author: changlu
 * @Date: 9:28 PM
 */
@RestController
public class CustomerController {


    @Autowired
    private CustomerRentFeign customerRentFeign;//远程调用

    @GetMapping("/customerRent")
    public String customerRent() {

        System.out.println("来进行访问租车了!");
        //进行一个远程调用
        String rent = customerRentFeign.rent();
        return rent;
    }
}
至此两个服务目前已经搭建完成!
3.2、启动服务,引入服务调用失败问题
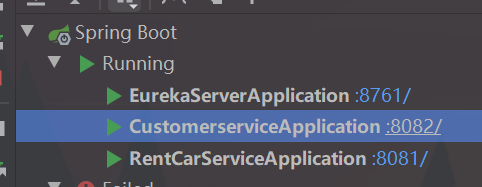
启动一个注册中心以及刚刚创建的两个服务:

访问一下(正常):localhost:8082/customerRent
然后我们把 RentCar 服务关闭掉之后,再次访问:
模拟 RentCar 这个服务崩掉了!
若是服务不可用,那么就会出现服务调用失败的情况,对于在高并发情况下若是频繁出现这种情况则会导致服务雪崩,从而出现大问题!
那么如何解决呢?
3.3、解决方案:使用 Hystrix 熔断器
引入过程:
① 引入 Hystrix 依赖:其实不引入也是可以的,因为feign 依赖中就自带 hystrix 依赖
<dependency>
    <groupId>org.springframework.cloud</groupId>
    <artifactId>spring-cloud-starter-netflix-hystrix</artifactId>
</dependency>
② 在配置中开启 Hystrix 熔断器:在 Hoxton.SR12 版本中默认是关闭的
feign:
  hystrix:
    enabled: true # 熔断器开启
③ 编写对应 feign 的熔断器
package com.changlu.customerservice.feign.hystrix;

import com.changlu.customerservice.feign.CustomerRentFeign;
import org.springframework.stereotype.Component;

/**
 * @Description: 消费者-借车熔断器
 * @Author: changlu
 * @Date: 9:19 AM
 */
@Component
//实现CustomerRentFeign接口!!!
public class CustomerRentHystrix implements CustomerRentFeign {

    @Override
    public String rent() {

        return "租车成功!(熔断器)";
    }
}
④ 在对应的 feign 中添加相应的 fallback 属性来指定对应的熔断方法
@FeignClient(value = "rent-car-service", fallback = CustomerRentHystrix.class)此时我们再来测试一下!
4.手写断路器
4.1、断路器设计
本质就是==在当前远程调用发起前对其进行代理==:
时间窗口滑动模型图:

断路器状态介绍以及不同的状态转变方案:三个状态 closed、half open、open
closed关:服务正常调用 A---》B
open开:在一段时间内,调用失败次数达到阀值(5s 内失败 3 次)(5s 失败 30 次的)则断路器打开,直接 return
half open半开:断路器打开后,过一段时间,让少许流量尝试调用 B 服务,如果成功则断路器关闭,使服务正常调用,如果失败,则继续半开注意点:
1、一个服务一个断路器实例。
2、其他手写时的相关问题。
断路器实例中的属性:① 断路器当前的状态。② 当前的错误次数。
三种状态如何切换?
默认刚开始是 closed(也就是正常去进行远程调用状态),一旦访问失败了一次,此时就会变为 open 状态,那么在
open 状态过程中会直接返回对应的断路器结果,在一定的时间窗口(指定秒数)到达之后【多线程添加一个定时
器】,且调用失败次数达到阀值,此时状态会进入到 half open 状态,那么就会放一些流量出来去尝试访问服务提供
方,若是发现此时访问成功,那么状态依旧会修改为 closed!
为什么要使用一个定时器来进行定期清除呢?
一些大量并发场景下,需要使用一个定时器来进行对失败次数清零。
4.2、实现断路器功能
首先准备好在 3.1 中的调用服务新案例,然后我们基于此来实现一个断路器:
实现完成之后如下:使用 AOP 实现
① 状态枚举:
package com.changlu.myhystrix.hystrix.model;

/**
 * @Description:
 * @Author: changlu
 * @Date: 9:54 AM
 */
public enum HystrixStatus {

    //定义三种状态:关闭、开启、半开
    CLOSE,
    OPEN,
    HALF_OPEN
}
② 断路器注解:
package com.changlu.myhystrix.hystrix.anno;

import java.lang.annotation.*;

/**
 * @Description:
 * @Author: changlu
 * @Date: 9:59 AM
 */
@Target(ElementType.METHOD) //面向方法
@Retention(RetentionPolicy.RUNTIME)  //运行时
@Documented
@Inherited
public @interface MyHystrix {

}
③ 断路器切面:
package com.changlu.myhystrix.hystrix.aspect;

import com.changlu.myhystrix.hystrix.HystrixPlus;
import com.changlu.myhystrix.hystrix.model.HystrixStatus;
import org.aspectj.lang.ProceedingJoinPoint;
import org.aspectj.lang.annotation.Around;
import org.aspectj.lang.annotation.Aspect;
import org.springframework.stereotype.Component;

import java.util.HashMap;
import java.util.Map;
import java.util.Random;

/**
 * @Description: 熔断器切面
 * @Author: changlu
 * @Date: 10:00 AM
 */
@Component
@Aspect
public class HystrixAspect {


    //切面表达式
//    public static final String POINT_COT = "execution (* com.changlu.myhystrix.controller.CustomerController.customerRent(..))";

    //定义一个断路器Map
    private static Map<String, HystrixPlus> hystrixMap = new HashMap<>();

    static {

        hystrixMap.put("rent-car-service", new HystrixPlus());
    }

    //随机器工具
    public static ThreadLocal<Random> randomThreadLocal = ThreadLocal.withInitial(()->new Random());

    //根据注解来进行切面处理
    @Around(value = "@annotation(com.changlu.myhystrix.hystrix.anno.MyHystrix)")
    public Object hystrixAround(ProceedingJoinPoint joinPoint) {

        //结果集
        Object res = null;
        //根据当前的服务名来获取到对应的断路器
        HystrixPlus hystrix = hystrixMap.get("rent-car-service");
        HystrixStatus status = hystrix.getStatus();
        switch (status) {

            case CLOSE:
                try {

                    return joinPoint.proceed();
                } catch (Throwable throwable) {

                    throwable.printStackTrace();
                    //进行计数,并且响应结果
                    hystrix.addFailCount();
                    return "熔断器返回结果";
                }
            case OPEN://打开状态,表示不能调用
                return "熔断器返回结果";
            case HALF_OPEN:
                Random random = randomThreadLocal.get();
                int num = random.nextInt(5);//[0-4]
                //方便回收
                randomThreadLocal.remove();
                //放行部分流量
                if (num == 1) {

                    try {

                        res = joinPoint.proceed();
                        //调用成功,断路器关闭
                        hystrix.setStatus(HystrixStatus.CLOSE);
                        //进行唤醒清理程序
                        synchronized (hystrix.getLock()) {

                            hystrix.getLock().notifyAll();
                        }
                        return res;
                    } catch (Throwable throwable) {

                        throwable.printStackTrace();
                        return "熔断器返回结果";
                    }
                }
            default:
                return "熔断器返回结果";
        }
    }

}
④ 断路器实现:
package com.changlu.myhystrix.hystrix;

import com.changlu.myhystrix.hystrix.model.HystrixStatus;
import lombok.Data;

import java.util.concurrent.Executors;
import java.util.concurrent.LinkedBlockingQueue;
import java.util.concurrent.ThreadPoolExecutor;
import java.util.concurrent.TimeUnit;
import java.util.concurrent.atomic.AtomicInteger;

/**
 * @Description:
 * @Author: changlu
 * @Date: 10:04 AM
 */
@Data
public class HystrixPlus {


    //时间窗口
    private static final Integer WINDOW_TIME = 20;
    //失败次数
    private static final Integer MAX_FAIL_COUNT = 3;

    //定义一个状态
    private HystrixStatus status = HystrixStatus.CLOSE;

    //错误次数计数器
    private AtomicInteger currentFailCount = new AtomicInteger(0);

    //定义一个线程池
    private ThreadPoolExecutor poolExecutor = new ThreadPoolExecutor(
            4,
            8,
30,
            TimeUnit.SECONDS,
            new LinkedBlockingQueue<>(2000),
            Executors.defaultThreadFactory(),
            new ThreadPoolExecutor.AbortPolicy()
    );

    //锁
    private Object lock = new Object();

    {

        //提交定期清零报错次数
        poolExecutor.execute(()->{

            while (true) {

                try {

                    TimeUnit.SECONDS.sleep(WINDOW_TIME);
                } catch (InterruptedException e) {

                    e.printStackTrace();
                }
                //根据当前的状态来判断是否要进行清理
                if (this.status.equals(HystrixStatus.CLOSE)) {

                    this.currentFailCount.set(0);
                }else {

                    // 半开或者开 不需要去记录次数 这个线程可以不工作
                    // 学过生产者 消费者模型  wait notifyAll  condition singleAll await   它们只能随机唤醒某一个线程
                    // lock锁 源码  CLH 队列 放线程 A B C D E  park unpark  可以 唤醒指定的某一个线程
//                    LockSupport.park();
//                    LockSupport.unpark();
                    try {

                        //进行阻塞,防止大量占据cpu
                        this.lock.wait();
                        System.out.println("开始进行失败次数清零操作");
                    } catch (InterruptedException e) {

                        e.printStackTrace();
                    }
                }
            }
        });
    }

    //增加错误次数,若是错误此时达到瓶颈,那么就需要将当前状态转为open状态并提交定时任务来进行修改为half open状态,并且清零
    public void addFailCount() {

        int i = currentFailCount.incrementAndGet();
        if (i >= MAX_FAIL_COUNT) {

            //将当前熔断器状态设置开启状态
            this.status = HystrixStatus.OPEN;
            poolExecutor.execute(()->{

                try {

                    TimeUnit.SECONDS.sleep(WINDOW_TIME);
                } catch (InterruptedException e) {

                    e.printStackTrace();
                }
                if (this.status != HystrixStatus.CLOSE) {

                    //设置半开状态并且计数清零
                    this.status = HystrixStatus.HALF_OPEN;
                    this.currentFailCount.set(0);
                }
            });
        }
    }

}
4.3、断路器测试
初始情况:启动三个服务,分别是注册中心,服务提供者以及服务消费方(也就是我们自定义实现断路器)
访问下网址路径:localhost:8082/customerRent
关闭服务提供方:
再此尝试访问:可以看到我们实现的熔断器起了效果
最终我们重启服务提供方:
可以看到也能够进行访问!
5.Hystrix 配置
5.1 详细配置
详细配置:hystrix 配置
完整配置:
server:
  port: 8081
spring:
  application:
    name: customer-service
eureka:
  client:
    service-url:
      defaultZone: http://47.100.238.122:8761/eureka
  instance:
    hostname: localhost
    instance-id: ${eureka.instance.hostname}:${spring.application.name}:${server.port}
feign:
  hystrix:
    enabled: true # 在cloud的F版以前 是默认开启的 但是因为后来有了其他的熔断组件
hystrix: #hystrix的全局控制
  command:
    default: #default是全局控制,也可以换成单个方法控制,把default换成方法名即可
      circuitBreaker:
        enabled: true #开启断路器
        requestVolumeThreshold: 3 #失败次数(阀值)  20s中失败3次打开
        sleepWindowInMilliseconds: 20000 #窗口时间,20s
        errorThresholdPercentage: 60 #失败率,20s中失败60%也打开
      execution:
        isolation: #隔离
          Strategy: thread #隔离策略 thread线程隔离集合和semaphore信号量隔离级别,这里选用thread线程隔离的方式
          #Strategy: semaphore
          thread:
            timeoutInMilliseconds: 3000 #调用超时时长,3s
      fallback:
        isolation:
          semaphore:
            maxConcurrentRequests: 1000 #信号量隔离级别最大并发数
ribbon:
  ReadTimeout: 5000 #要结合feign的底层ribbon调用的时长
  ConnectTimeout: 5000
5.2 隔离策略
对于配置中的隔离方式策略介绍如下:隔离策略包含 thread 线程以及 semphore 信号量隔离
目的:防止某台服务器接收请求过多,达到阈值时进行隔离阻断!
1、线程隔离(场景:访问量比较大):
说明:按照 group(各有 10 个线程)划分服务提供者,用户请求的线程 和 做远程调用的线程(代理)不一样。
好处:当 B 服务调用失败了 或者请求 B 服务的量太大了 不会对 C 服务造成影响 用户访问比较大的情 况下使用比较好 异步的方式。
缺点:具有线程切换的开销,对机器性能影响。
应用场景 调用第三方服务 并发量大的情况下
2、SEMAPHORE 信号量隔离(场景:访问量比较小):
说明:每次请求进来 有一个原子计数器(所有提供者共用一个计数器) 做请求次数的++ 当请求完成以后 --。
好处:对 cpu 开销小。
缺点:并发请求不易太多 当请求过多 就会拒绝请求 做一个保护机制。
场景:使用内部调用 ,并发小的情况下。
但是隔离策略的配置是有默认值的,可以写也可以不写!
[1]. hystrix 配置
[2]. Hystrix 的原理及使用
[3]. 视频教程: 动力节点最新 SpringCloud 视频教程|最适合自学的 springcloud+springcloudAlibaba
